


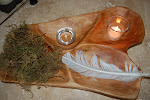


Today, the girls and I wanted to make an Easter Tree to celebrate the upcoming holiday. We wanted to create something natural for our table, that would represent life, and also be somewhat shaped like a cross. I thumbed through my Easter Craft Book and found just what we were hoping for, though we wanted something a little more organic looking, so we headed outside to find some branches or vines and thought that our Apple Blossoms would be perfect...

Cut some off and headed inside...

What you will need:
1. branches or vines and scissors to cut them
2. dowel rods and/or bamboo skewers or sticks even - one long one (dowel rod) and then three skewers long, medium, and short on the top
3. twisties, pipecleaners, or florist tape to secure the vines to the rod and skewers
4. a pot and some dirt or sand (rocks to help secure your tree)
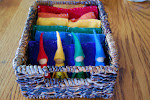
5. decorations (felted eggs, real eggs, flowers, or whatever you want to decorate with)

We started with wire, but had to abandon it for something easier to manipulate. The wire cut right through our vine. So we used what we had on hand - green twisties and green pipecleaners.
We laid the dowel rod in the center and then attached the longest skewer and worked our way up the rod, placing the medium one in the center and the shortest one near the top. We cut the vines to fit and then attached them to the rod and skewers, going up the dowel rod first.


We then headed outside, held it in the pot and placed small rocks inside to help hold it upright before we filled it with potting soil.


Once it was all filled (we had placed ours in a small round pot and then in a large rectangular 'pot'), we brought it inside and filled in the ground level with the remaining apple blossoms. Because this is a succulent, we should be able to keep it going with spritzes of water and hopefully it will rejenerate, as well!

Finally, the girls added some hanging eggs that their Gramy had sent to them last year, though you can wetfelt eggs to add with strings, or decorate in any way you want! And voila! You have an Easter Tree :)

I have some other posts on preparing for the Easter season if you click on the "Easter" link. Enjoy and I'd love to see your Easter Tree if you have or will make one! If anyone emails a photo and/or link to your blog, I'd love to put up your photos to share!
On your previous Easter post, you showed the girls painting blown eggs. These are wonderful to run a piece of yarn through and hang!
ReplyDeleteHints and tips for blowing eggs -
1. get a long but sharp embroidery needle (clean it with soap and water if it's been around a while). Pierce the top and then the bottom of the egg. While piercing the bottom, wiggle the needle gently to try to open up the membrane and break the yolk. You can gently shake the egg, too, to be sure the yolk is broken.
2. Take a pair of cuticle scissors (washed too) or the scissors of a Swiss Army knife (just found out this works well, too.) Carefully and gently snip around the bottom hole until you have about a 1/2 inch diameter hole.
3. Blow! (and make Quiche!) The egg should come out fast and easily and not pop a blood vessel in the process. You can rinse the inside of the egg with warm running water and decorate anyway you like.
LOL! Thank you! I never do the blowing b/c it's too hard on my ears, but Tony will THANK YOU profusely, Christine! He won't have any vessels to pop otherwise :) LOL!
ReplyDeleteohhh how pretty. good job you guys xx
ReplyDeleteLove your blog!
ReplyDeleteBeautiful!!! Lovelvoelvoevloe your blog mama!
ReplyDeleteSo glad to have found it!
Blessings,
Samantha (Woodland Woolens)